Pits of Inferno Quest: Difference between revisions
No edit summary |
No edit summary |
||
| (12 intermediate revisions by the same user not shown) | |||
| Line 1: | Line 1: | ||
{{InfoboxQuest | {{InfoboxQuest | ||
| title = Pits of Inferno Quest | | title = Pits of Inferno Quest | ||
| image = | | image = pitsofinferno7tps.png | ||
| caption = Entrance to The Annihilator Quest | | caption = Entrance to The Annihilator Quest | ||
| location = South of Plains of Havoc | | location = South of Plains of Havoc | ||
| level = 80 | | level = 80 | ||
| dangers = Phantasm, Destroyer, Lost Soul, Blightwalker, Plaguesmith, Nightmare, Juggernaut, Diabolic Imp, Fury, Hellfire Fighter, Dragon Lord, Spectre, Hand of Cursed Fate, Dark Torturer, Hellhound, Defiler, Betrayed Wraith | | dangers = Phantasm, Destroyer, Lost Soul, Blightwalker, Plaguesmith, Nightmare, Juggernaut, Diabolic Imp, Fury, Hellfire Fighter, Dragon Lord, Spectre, Hand of Cursed Fate, Dark Torturer, Hellhound, Defiler, Betrayed Wraith | ||
| reward = | | reward = Pair of Soft Boots , Backpack of Holding , Stuffed Dragon , Frozen Starlight | ||
One to choose from: | One to choose from: Arbalest, Arcane Staff, Avenger | ||
}} | }} | ||
| Line 24: | Line 24: | ||
== Location == | == Location == | ||
[[ | [[Pits of Inferno]] | ||
== Dangers == | == Dangers == | ||
The quest involves monsters like [[ | The quest involves monsters like [[Phantasm|Phantasms]], [[Destroyer|Destroyers]], [[Lost Soul|Lost Souls]], [[Blightwalker|Blightwalkers]], [[Plaguesmith|Plaguesmiths]], [[Nightmare|Nightmares]], [[Juggernaut|Juggernauts]], [[Diabolic Imp|Diabolic Imps]], [[Fury|Furys]], [[Hellfire Fighter|Hellfire Fighters]], [[Spectre|Spectres]], [[Hand of Cursed Fate|Hand of Cursed Fates]], [[Dark Torturer|Dark Torturers]], [[Hellhound|Hellhounds]], [[Defiler|Defilers]] and [[Betrayed Wraith|Betrayed Wraiths]] | ||
== Rewards == | == Rewards == | ||
| Line 53: | Line 53: | ||
* Minimum level of 80. | * Minimum level of 80. | ||
* A team that includes all four vocations. | * A team that includes all four vocations. | ||
* [[Shovel]] | |||
* [[Rope]] | |||
* [[Pick]] | |||
* [[Vial of Blood]] | |||
* [[Vial of Oil]] | |||
* [[Key 3700]] Can be found in a cave south of [[Venore]] | |||
* [[Holy Tible]] can be found in a chest, east of Knightwatch Tower. | |||
== Walkthrough == | == Walkthrough == | ||
=== Getting There === | === Getting There === | ||
Travel to Venore | Travel to Venore then head to the underground of the necromancer's house in the [[Plains of Havoc]], then go to the small room in the east of the tunnels, where you use a [[Pick]]. | ||
<br> | |||
[[File:POI-1.png|300px]] | |||
<br><br> | |||
[[File:POI-2.png|200px]] | |||
<br><br> | |||
To move on, spill [[Vial of Blood]] on the grave of the necromancer Goshnar. You will be teleported to the room below. | |||
<br> | |||
[[File:POI-3.png|500px]] | |||
<br><br> | |||
As you enter the magic field, you will be taken to the other side of the magic wall. | |||
<br> | |||
To pass, you must have a PACC, and a [[Holy Tible]] in your backpack. | |||
<br> | |||
Then head east past the level gate and go down. | |||
<br> | |||
Going further you will find a closed bridge, unfortunately the lever is old and rusty, so you will have to use [[Vial of Oil]]. | |||
<br> | |||
[[File:POI-4.png|500px]] | |||
<br><br> | |||
Behind the bridge you will find a river blocked by a stone, and a lake of lava. | |||
<br> | |||
Use the [[pick]] on the stone to make the lava turn into a solidified crust so you can continue your journey. | |||
<br> | |||
[[File:POI-5.png|500px]] | |||
<br><br> | |||
Now head to the northern hole to the right of the bridge. | |||
<br> | |||
Below you will find a cave with a large number of [[Dragon Lord]]s who will defend their territory. | |||
<br> | |||
In this case, in order to complete the task, we will have to fight them. | |||
<br> | |||
Head to the place where you can climb the rope, in the east of the cave. | |||
<br> | |||
[[File:POI-6.png|350px]] | |||
<br><br> | |||
You will find yourself in a room with 4 paths. | |||
<br> | |||
[[File:POI-7.png|500px]] | |||
<br> | |||
Here, each of the four professions must pass a test to unlock the path to the [[Pits of Inferno]]. | |||
Each of the four ways is for a particular profession. Stepping On If we take the wrong path, a warning will appear. | |||
<br> | |||
If we take the wrong path to the end, it will end in death, as the final flame takes the wrong profession's entire life. | |||
<b>Knight</b> - north</br> | |||
<b>Druid</b> - northeastern</br> | |||
<b>Paladin</b> - southeastern</br> | |||
<b>Sorcerer</b> - south</br> | |||
<b>Note: Each step along the flames causes a loss of 300 HP.</b> | |||
At the end of the path there is a place where you should use a [[rope]]. Above it is a room with 3 monsters: | |||
<b>Knight</b> - 2 [[Diabolic Imp]] and 1 [[Spectre]]</br> | |||
<b>Druid</b> - 1 [[Spectre]], 1 [[Diabolic Imp]] and 1 [[Nightmare]]</br> | |||
<b>Paladin</b> - 1 [[Spectre]] and 2 [[Nightmare]]</br> | |||
<b>Sorcerer</b> - 1 [[Spectre]] and 2 [[Nightmare]]</br> | |||
In addition, in each room there is a lever that must be toggled to make the walls of fire, which block the way forward, disappear. | |||
=== | Once all the walls of fire have been removed, you can continue your expedition. | ||
You have holes in front of you that lead to the lever cave, and a teleport that will take you in front of the walls of fire. | |||
<br> | |||
There is also a quest door on the left side of the room, which we will be able to pass through after completing the next item with levers, | |||
<br> | |||
the tunnel behind the door leads behind the stones to the blightwalkers. | |||
<br> | |||
Now, you need to remove the two boulders blocking access to the ladder east of the cave entrance. | |||
<br> | |||
Unfortunately, the task is not easy, as each lever is guarded by hordes of monsters, and the levers must be switched in the right order. | |||
<br> | |||
The last lever, which removes the boulders, will only work for a certain amount of time after switching all the previous levers. | |||
<br> | |||
[[File:POI8.png|300px]] | |||
<br><br> | |||
[[File:POI-9.png|300px]] | |||
<br><br> | |||
[[File:POI-10.png|300px]] | |||
<br><br> | |||
[[File:POI-11.gif|150px]] | |||
<br><br> | |||
When you get to the place behind the boulders, you will find a teleport leading to the exit from the underground, and a ladder leading to the next part of the task. | |||
<br> | |||
After climbing the ladder to the next room, you will find a room with several [[Blightwalker]]s and another 15 levers and a riddle book. | |||
<br> | |||
You don't need to move any levers here because they are all useless. | |||
<br> | |||
Divide the team into two parts, one will stay in this room, the other will head north. | |||
<br> | |||
[[File:POI-12.png|500px]] | |||
<br> | |||
First switch the levers on the left (the stalagmite blocking the second lever will disappear), and then the lever on the right. | |||
<br> | |||
When you do this you will be able to continue north to the hole, as a bridge will appear in front of the hole. | |||
<br> | |||
When you go lower, advance north, then east until you find a panel that acts as a lever that activates the ladder in the room with 15 levers. | |||
<br> | |||
Now have the second team climb the ladder and knock out the monsters there. | |||
<br> | |||
Once they are all there the first team can go back to the room with the levers. | |||
<br> | |||
Unfortunately, the ladder disappears when you step off the tile, so the second team will have to be ditched. | |||
<br> | |||
Once everyone is in the only place you can go higher using, rope place above going down the ladder. | |||
<br> | |||
In front of you is a maze with invisible teleports: | |||
<br> | |||
[[File:POI-13.gif|350px]] | |||
<br> | |||
<b>X</b> - teleports to avoid | |||
Use the [[pick]] here and go downstairs. You need to switch the lever that is located in the eastern | |||
<br> | |||
part of the room to remove the boulder blocking access to the ladder, when you get to the top head west. | |||
<br> | |||
Now you have a choice whether you want to continue your journey or return home. | |||
<br> | |||
The hole in the north leads to the [[Plains of Havoc]]. South level gate. | |||
<br> | |||
Heading to the south hole you will find a skeleton and in it a [[Pirate Backpack]] with: | |||
[[Ceremonial Ankh]]</br> | |||
[[Death Ring]]</br> | |||
[[Life Ring]]</br> | |||
3 [[Orichalcum Pearl]]</br> | |||
5 [[White Pearl]]</br> | |||
2 [[Soul Orb]]</br> | |||
11 [[Platinum Coin]]s</br> | |||
2 [[Sudden Death Rune]]</br> | |||
3 [[Ultimate Healing Rune]]</br> | |||
[[Blank Rune]]</br> | |||
[[Mana Fluid]].</br> | |||
Going down the ladder head north, at a certain point a stone will appear behind you and you will be teleported to another room. | |||
<br> | |||
To let the others pass you must switch the lever which is located in the northern part of the room. | |||
<br> | |||
Going north, you will end up in a room with teleports to the throne chambers of The Ruthless Seven | |||
<br> | |||
[[File:POI-14.jpg|500px]] | |||
<br> | |||
To pass each room you must enter each throne twice. | |||
<br><br> | |||
<span style="font-size:150%;">Ruthless Seven throne chambers</span> | |||
<br><br> | |||
<span style="font-size:120%;">Apocalypse throne room</span> | |||
<br> | |||
In this room you will face these monsters: [[Destroyer]] , [[Fury]] , [[Demon]] and [[Juggernaut]] | |||
<br> | |||
[[File:POI-15.jpg|400px]] | |||
<br><br> | |||
<span style="font-size:120%;">Ashphalor's throne room</span> | |||
<br> | |||
In this room you will face these monsters: [[Lich]] , [[Demon]] and [[Undead Dragon]] | |||
<br> | |||
[[File:POI-16.gif|400px]] | |||
<br><br> | |||
<span style="font-size:120%;">Bazir's throne room:</span> | |||
<br> | |||
In this room you will face these monsters: [[Phantasm]] , [[Demon]] and [[Nightmare]] | |||
<br> | |||
To get to the chamber with the throne you will have to go through a maze: | |||
<br> | |||
[[File:POI-17.png|350px]] | |||
<br><br> | |||
[[File:POI-18.png|350px]] | |||
<br><br> | |||
[[File:POI-19.png|350px]] | |||
<br> | |||
<b>L</b> - the lever you need to use to make the teleport appear. | |||
<br> | |||
After entering the teleport, keep going until you get to the room, with statues, go south to the treasure. | |||
<br> | |||
You will be teleported to a room where you must reveal the mirror and use it. | |||
<br> | |||
When you do this you will appear in the throne room. | |||
<br> | |||
After passing the room, step onto the carpet in front of the left statue to leave the room. | |||
<br> | |||
[[File:POI-20.png|400px]] | |||
<br><br> | |||
<span style="font-size:120%;">Infernatil's throne room</span> | |||
<br> | |||
In this room you will face these monsters: [[Hellfire Fighter]] , [[Demon]] and [[Hellhound]] | |||
<br> | |||
[[File:POI-21.gif|400px]] | |||
<br><br> | |||
<span style="font-size:120%;">Pumin's throne room:</span> | |||
<br> | |||
In this room you will face these monsters: [[Betrayed Wraith]] , [[Demon]], [[Spectre]] and [[Hand of Cursed Fate]] | |||
<br> | |||
Before entering the throne room, you will need to obtain permission by getting the appropriate forms. Talk to undead NPCs in the proper order: | |||
*<b>A Dead Bureaucrat 1:</b> Hi - Pumin - Your nickname - Your profession - Pumin. | |||
*<b>A Dead Bureaucrat 4:</b> Hi - Pumin - Your nickname - Your profession - 356. | |||
*<b>A Dead Bureaucrat 3:</b> Hi - Pumin - Your nickname - Your profession - 145 | |||
*<b>A Dead Bureaucrat 1:</b> Hi - 411 - no | |||
*<b>A Dead Bureaucrat 2:</b> Hi - 287 | |||
*<b>A Dead Bureaucrat 1:</b> Hi - 411 - yes | |||
*<b>A Dead Bureaucrat 3:</b> Hi - 145 | |||
*<b>A Dead Bureaucrat 4:</b> Hi - 356 | |||
*<b>A Dead Bureaucrat 1:</b> Hi - 356. | |||
After the dialogues are done correctly, the NPC will answer us: | |||
*<b>A Dead Bureaucrat:</b> INCREDIBLE, you did it!!! Have fun at Pumin's domain! | |||
and we can enter the teleport further. | |||
<br> | |||
[[File:POI-22.gif|400px]] | |||
<br><br> | |||
<span style="font-size:120%;">Verminor's throne room:</span> | |||
<br> | |||
In this room you will face these monsters: [[Defiler]] , [[Plaguesmith]], [[Son of Verminor]] and [[Blightwalker]] | |||
<br> | |||
[[File:POI-23.gif|400px]] | |||
<br><br> | |||
[[File: | <span style="font-size:120%;">Tafariel's throne room:</span> | ||
<br> | |||
In this room you will face these monsters: [[Banshee]] , [[Dark Torturer]], [[Lost Soul]] and [[Demon]] | |||
<br> | |||
[[File:POI-24.gif|400px]] | |||
<br> | |||
=== Claiming the Reward === | |||
Once you have successfully completed all the halls go to the north of the room with teleports. | |||
<br> | |||
Then go through the traps to the door next to which the NPC is standing, to open use the Key 3700. | |||
<br> | |||
Now head to the teleport and collect the rewards. | |||
<br> | |||
[[File:poirewardroom.png|500px]] | |||
<br> | |||
== Strategy Tips == | == Strategy Tips == | ||
* Use area spells and runes to maximize damage. | * Use area spells and runes to maximize damage. | ||
* Coordinate with your team to distribute healing and attacks evenly. | * Coordinate with your team to distribute healing and attacks evenly. | ||
* Be prepared with escape plans in case the battle turns against you. | * Be prepared with escape plans in case the battle turns against you. | ||
Latest revision as of 19:13, 28 April 2024
Legends[edit]
PoI is also home to the famous Pits of Inferno Quest.
Pits of Inferno is a complex of caves, deep under the POH. The entrance to these "Pits of Inferno" was discovered relatively recently.
There are strong monsters there, including: Plaguesmith, Spectre, Dark Torturer, Son of Verminor, and Juggernaut.
The Pits of Inferno is the home of The Ruthless Seven, or the seven merciless demons. Recently, the entrance to the Knightwatch Tower was discovered.
A place teeming with creatures and monsters. Definitely only for high-level players.
It's practically impossible to survive on your own, and from experience, teams on the Pits of Inferno Quest even consist of more than 10 players anyway.
Location[edit]
Dangers[edit]
The quest involves monsters like Phantasms, Destroyers, Lost Souls, Blightwalkers, Plaguesmiths, Nightmares, Juggernauts, Diabolic Imps, Furys, Hellfire Fighters, Spectres, Hand of Cursed Fates, Dark Torturers, Hellhounds, Defilers and Betrayed Wraiths
Rewards[edit]
One out of three available items:
And:
- 10.000 gp
- Ultimate Healing Rune x10
- Sudden Death Rune x10
- Explosion Rune x30
- Heavy Magic Missile Rune x50
- Ability to use a shortcut to Pits of Inferno, located on the 1st floor of the necromancer's house on the Plains of Havoc
Overview[edit]
Pits of Inferno Quest is a high-level quest in Tibia, designed for a team of four players, each at least level 80. The quest is notorious for its difficulty and is considered a rite of passage for top-level players seeking to earn exclusive rewards.
Requirements[edit]
- Minimum level of 80.
- A team that includes all four vocations.
- Shovel
- Rope
- Pick
- Vial of Blood
- Vial of Oil
- Key 3700 Can be found in a cave south of Venore
- Holy Tible can be found in a chest, east of Knightwatch Tower.
Walkthrough[edit]
Getting There[edit]
Travel to Venore then head to the underground of the necromancer's house in the Plains of Havoc, then go to the small room in the east of the tunnels, where you use a Pick.


To move on, spill Vial of Blood on the grave of the necromancer Goshnar. You will be teleported to the room below.

As you enter the magic field, you will be taken to the other side of the magic wall.
To pass, you must have a PACC, and a Holy Tible in your backpack.
Then head east past the level gate and go down.
Going further you will find a closed bridge, unfortunately the lever is old and rusty, so you will have to use Vial of Oil.

Behind the bridge you will find a river blocked by a stone, and a lake of lava.
Use the pick on the stone to make the lava turn into a solidified crust so you can continue your journey.
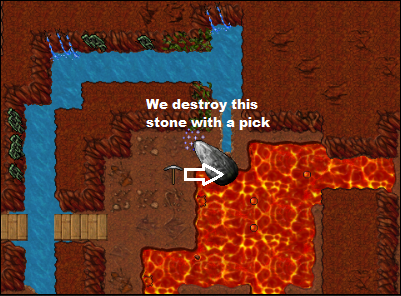
Now head to the northern hole to the right of the bridge.
Below you will find a cave with a large number of Dragon Lords who will defend their territory.
In this case, in order to complete the task, we will have to fight them.
Head to the place where you can climb the rope, in the east of the cave.

You will find yourself in a room with 4 paths.
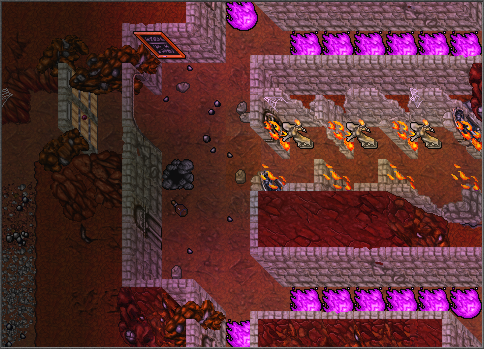
Here, each of the four professions must pass a test to unlock the path to the Pits of Inferno.
Each of the four ways is for a particular profession. Stepping On If we take the wrong path, a warning will appear.
If we take the wrong path to the end, it will end in death, as the final flame takes the wrong profession's entire life.
Knight - north
Druid - northeastern
Paladin - southeastern
Sorcerer - south
Note: Each step along the flames causes a loss of 300 HP.
At the end of the path there is a place where you should use a rope. Above it is a room with 3 monsters:
Knight - 2 Diabolic Imp and 1 Spectre
Druid - 1 Spectre, 1 Diabolic Imp and 1 Nightmare
Paladin - 1 Spectre and 2 Nightmare
Sorcerer - 1 Spectre and 2 Nightmare
In addition, in each room there is a lever that must be toggled to make the walls of fire, which block the way forward, disappear.
Once all the walls of fire have been removed, you can continue your expedition.
You have holes in front of you that lead to the lever cave, and a teleport that will take you in front of the walls of fire.
There is also a quest door on the left side of the room, which we will be able to pass through after completing the next item with levers,
the tunnel behind the door leads behind the stones to the blightwalkers.
Now, you need to remove the two boulders blocking access to the ladder east of the cave entrance.
Unfortunately, the task is not easy, as each lever is guarded by hordes of monsters, and the levers must be switched in the right order.
The last lever, which removes the boulders, will only work for a certain amount of time after switching all the previous levers.


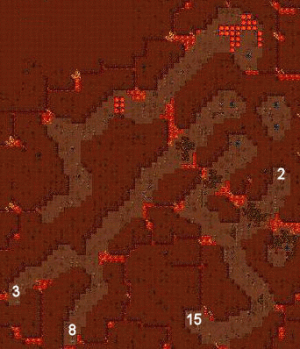
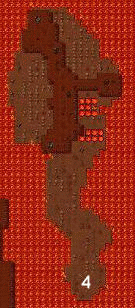
When you get to the place behind the boulders, you will find a teleport leading to the exit from the underground, and a ladder leading to the next part of the task.
After climbing the ladder to the next room, you will find a room with several Blightwalkers and another 15 levers and a riddle book.
You don't need to move any levers here because they are all useless.
Divide the team into two parts, one will stay in this room, the other will head north.
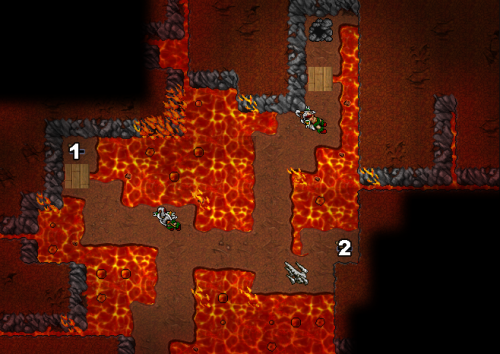
First switch the levers on the left (the stalagmite blocking the second lever will disappear), and then the lever on the right.
When you do this you will be able to continue north to the hole, as a bridge will appear in front of the hole.
When you go lower, advance north, then east until you find a panel that acts as a lever that activates the ladder in the room with 15 levers.
Now have the second team climb the ladder and knock out the monsters there.
Once they are all there the first team can go back to the room with the levers.
Unfortunately, the ladder disappears when you step off the tile, so the second team will have to be ditched.
Once everyone is in the only place you can go higher using, rope place above going down the ladder.
In front of you is a maze with invisible teleports:

X - teleports to avoid
Use the pick here and go downstairs. You need to switch the lever that is located in the eastern
part of the room to remove the boulder blocking access to the ladder, when you get to the top head west.
Now you have a choice whether you want to continue your journey or return home.
The hole in the north leads to the Plains of Havoc. South level gate.
Heading to the south hole you will find a skeleton and in it a Pirate Backpack with:
Ceremonial Ankh
Death Ring
Life Ring
3 Orichalcum Pearl
5 White Pearl
2 Soul Orb
11 Platinum Coins
2 Sudden Death Rune
3 Ultimate Healing Rune
Blank Rune
Mana Fluid.
Going down the ladder head north, at a certain point a stone will appear behind you and you will be teleported to another room.
To let the others pass you must switch the lever which is located in the northern part of the room.
Going north, you will end up in a room with teleports to the throne chambers of The Ruthless Seven

To pass each room you must enter each throne twice.
Ruthless Seven throne chambers
Apocalypse throne room
In this room you will face these monsters: Destroyer , Fury , Demon and Juggernaut

Ashphalor's throne room
In this room you will face these monsters: Lich , Demon and Undead Dragon

Bazir's throne room:
In this room you will face these monsters: Phantasm , Demon and Nightmare
To get to the chamber with the throne you will have to go through a maze:


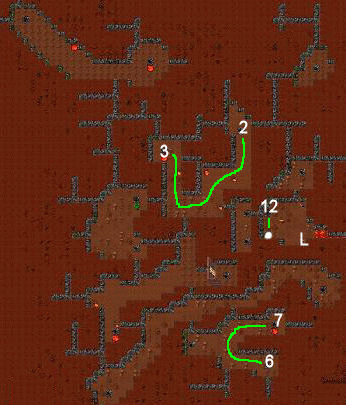
L - the lever you need to use to make the teleport appear.
After entering the teleport, keep going until you get to the room, with statues, go south to the treasure.
You will be teleported to a room where you must reveal the mirror and use it.
When you do this you will appear in the throne room.
After passing the room, step onto the carpet in front of the left statue to leave the room.

Infernatil's throne room
In this room you will face these monsters: Hellfire Fighter , Demon and Hellhound

Pumin's throne room:
In this room you will face these monsters: Betrayed Wraith , Demon, Spectre and Hand of Cursed Fate
Before entering the throne room, you will need to obtain permission by getting the appropriate forms. Talk to undead NPCs in the proper order:
- A Dead Bureaucrat 1: Hi - Pumin - Your nickname - Your profession - Pumin.
- A Dead Bureaucrat 4: Hi - Pumin - Your nickname - Your profession - 356.
- A Dead Bureaucrat 3: Hi - Pumin - Your nickname - Your profession - 145
- A Dead Bureaucrat 1: Hi - 411 - no
- A Dead Bureaucrat 2: Hi - 287
- A Dead Bureaucrat 1: Hi - 411 - yes
- A Dead Bureaucrat 3: Hi - 145
- A Dead Bureaucrat 4: Hi - 356
- A Dead Bureaucrat 1: Hi - 356.
After the dialogues are done correctly, the NPC will answer us:
- A Dead Bureaucrat: INCREDIBLE, you did it!!! Have fun at Pumin's domain!
and we can enter the teleport further.

Verminor's throne room:
In this room you will face these monsters: Defiler , Plaguesmith, Son of Verminor and Blightwalker

Tafariel's throne room:
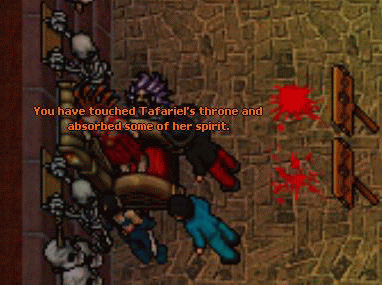
In this room you will face these monsters: Banshee , Dark Torturer, Lost Soul and Demon
Claiming the Reward[edit]
Once you have successfully completed all the halls go to the north of the room with teleports.
Then go through the traps to the door next to which the NPC is standing, to open use the Key 3700.
Now head to the teleport and collect the rewards.

Strategy Tips[edit]
- Use area spells and runes to maximize damage.
- Coordinate with your team to distribute healing and attacks evenly.
- Be prepared with escape plans in case the battle turns against you.
